


Honestly, many people didn’t even know their PC didn’t support Windows 11 until they tried the upgrade and got a clear „no.“ No real explanation, just a message saying the computer wasn’t compatible. And then the Googling begins—usually something like „can my PC run Windows 11“ at midnight.
But „not compatible“ doesn’t always mean what you think. Sometimes it’s just a setting that’s turned off. Finding out if your PC is suitable for Windows 11 takes about two minutes – and this guide will walk you through the process.
Overview of Windows 11 system requirements
Windows 11 isn’t just about speed. Microsoft has compiled a fairly detailed list of what a PC must have before it will even consider the upgrade. Most of it is fairly straightforward. But there’s one requirement—TPM 2.0—that nobody really talks about until it blocks you. We’ll get to that in a moment.
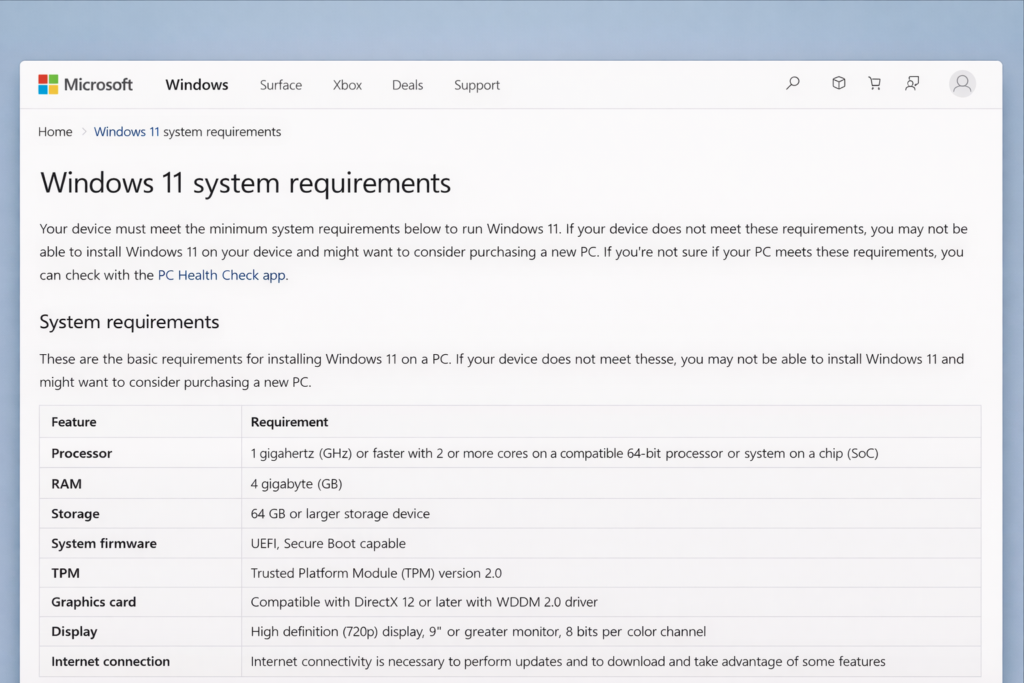
To find out if your PC is suitable for Windows 11, here is the complete checklist from Microsoft. Your computer must meet all of these requirements, not just most of them:
Processor: 1 GHz or faster, at least 2 cores, 64-bit. If your PC was built after 2017, you’re probably fine. With older Intel Core i3, i5, or i7 chips from around 2015 and earlier, things start to get complicated.
RAM: At least 4 GB. Anyone with only 2 GB will not be able to start the installation.
Storage: 64 GB of free space. Not the total size of the hard drive, but the actual free space. Worth checking first.
System firmware: UEFI with Secure Boot. This is a BIOS setting. Most PCs from 2012 onwards support this, even if it’s not yet enabled.
TPM: Version 2.0. This is the big point, and the one that confuses most people. TPM is a security chip built into most modern motherboards—it handles encryption and secure booting. The problem is that it’s disabled by default on many PCs. So, your PC could actually be compatible with Windows 11 without you knowing it, simply because TPM is turned off. More on that below.
Graphics: DirectX 12 compatible with a WDDM 2.0 driver. Virtually every graphics card from the last decade meets this requirement.
Display: 720p, at least 9 inches. No normal monitor or laptop screen will fail here.
Internet: Required for Windows 11 Home setup. This can be bypassed in Windows 11 Pro, although it requires a few extra steps.
Realistically, the two things that rule out most PCs are the processor generation and TPM 2.0. Everything else on this list is rarely the real problem. If you’re already fairly certain your computer meets the requirements and only need to sort out the license, buying a genuine Windows 11 license key is a safe bet.
Check compatibility with the PC integrity check
Microsoft has developed a free tool for exactly this purpose. It’s called PC Health Check and is essentially Microsoft’s own answer to the question „Can my computer run Windows 11?“ – it tells you in about 30 seconds whether you’re well-prepared or not.
Search for „PC Integrity Checker“ in the Start menu. If it’s not there, download it for free from microsoft.com/de-de/windows/windows-11. Open it, click „Check now,“ and it will automatically run through everything. It will either tell you that you’re ready to go, or it will display a list of what’s blocking you.

If the tool identifies TPM as a problem, don’t write off your PC just yet. Remember that chip we mentioned—the one that’s often simply disabled by default? That’s probably all it means. Nine times out of ten, it just means TPM is disabled in the BIOS, not that your PC is incompatible with Windows 11 at all.
So prüfst du das: PC neu starten und ins BIOS. Das machst du, indem du F2, F10, Entf oder Esc direkt beim Start des Computers drückst – das hängt vom Hersteller ab, also probiere sie aus, wenn eine nicht funktioniert. Sobald du drin bist, nach einem Abschnitt namens Sicherheit, Erweitert oder Trusted Computing suchen. Die TPM-Einstellung könnte als „TPM-Gerät“, „Sicherheitsgerät“, „Intel PTT“ auf Intel-Rechnern oder „AMD fTPM“ auf AMD erscheinen. Wenn es Deaktiviert anzeigt, auf Aktiviert umschalten, speichern und beenden. Dann den PC-Integritätscheck erneut ausführen.
Eine riesige Anzahl von Leuten, die denken, ihr PC kann Windows 11 nicht ausführen, behebt das Problem genau dort, indem sie einfach TPM aktivieren. Es lohnt sich immer, das zu prüfen, bevor man das Schlimmste annimmt. Wenn du erst einmal in Betrieb bist, lohnt es sich auch zu wissen, wie man Windows 11 auf vollen Touren hält, besonders auf älterer Hardware, wo die Dinge schneller langsamer werden können.
Wenn Secure Boot ebenfalls angezeigt wird, ist es die gleiche Art von Fix – ins BIOS gehen, Secure Boot finden, einschalten. Nur vorher überprüfen, ob das Laufwerk auf UEFI-Modus statt Legacy oder CSM eingestellt ist, sonst könnte der PC danach nicht mehr starten. Wenn du dir nicht sicher bist, deinen spezifischen PC-Modellnamen plus „Secure Boot aktivieren“ suchen – das ist für so gut wie jede Maschine gut dokumentiert. Und wenn Windows Update während oder nach dem Upgrade Probleme macht, ist der Windows Update Fehlerbehebungsleitfaden ein guter, den man gespeichert haben sollte.
Mein PC ist nicht kompatibel – was nun?
Du hast also alles gemacht – den PC-Integritätscheck ausgeführt, „kann mein Computer Windows 11″ gegoogelt, im BIOS herumgegraben – und die Antwort ist immer noch nein. Dein PC ist nicht kompatibel mit Windows 11. Es gibt immer noch etwas, das du dagegen tun kannst.
Option 1: Vorerst bei Windows 10 bleiben – aber einen Plan haben
Windows 10 hat im Oktober 2025 das Ende des Mainstream-Supports erreicht, also sind kostenlose Sicherheitsupdates von Microsoft vorbei. Es läuft im Alltag noch gut, aber es langfristig ohne Patches zu lassen ist nicht ideal. Wenn dein PC ansonsten gut läuft, ist es eine vernünftige Entscheidung, kurzfristig bei Windows 10 zu bleiben, während du deinen nächsten Schritt planst – lass es nur nicht für immer so. Eine ordentliche Windows 10 Pro Lizenz kaufen ist es wert, wenn du noch eine Weile dabei bleibst.
Option 2: Hardware upgraden
If the only thing standing between you and Windows 11 is your processor, upgrading the CPU or motherboard is technically an option—but it depends heavily on what kind of machine you have. It’s fairly doable on a desktop. For a laptop, forget it. The processor is usually soldered directly to the motherboard, meaning it’s not going anywhere. If you do decide to go the desktop upgrade route, check Microsoft’s processor compatibility list before buying anything—the last thing you want is to spend money on a new chip only to find out it still doesn’t qualify.
Option 3: Get a new PC and sort out the license.
If your hardware is so old that it simply can’t be made compatible with Windows 11, a new computer might be the practical solution. Once you get one, you’ll need a valid license key – buying Windows 11 Pro or Windows 11 Home licenses is available at significantly better prices than buying directly from Microsoft. If you’re also installing Office on the new computer, the Windows 11 Pro + Office 2024 Professional Plus bundle offers even better value.
However, before you take any steps, it’s worth finding out what happens to your Windows license after a hardware change – especially relevant if you’re replacing a motherboard or transferring everything to a new machine.
Option 4: The unofficial bypass – your decision
There is a way to install Windows 11 on a PC that fails the compatibility check. People have figured out how to bypass the TPM and CPU requirements during setup, and it’s not exactly a secret—there are tutorials all over the internet. Microsoft is aware of this and hasn’t stopped it, but they’ve made it pretty clear that if anything goes wrong on a machine installed this way, it’s your problem, not theirs. No guaranteed updates, no support. On an old laptop you use for browsing and watching Netflix? Probably fine. On anything you really need for work? Not worth the hassle.